Melt the butter on the stove if you want perfect, evenly melted butter or if the recipe calls for frosting. If you want to save time, use the microwave, but follow the instructions provided to avoid heating too quickly or unevenly. Finally, if you just want to soften butter that has been stored in the refrigerator or freezer, you have many options, which we will cover in this article.
Steps
Melting or frosting butter on the stove
- You don't have to try to get a specific size. Try cutting a stick of butter into four or five pieces.
-
Place the oil in a heavy saucepan or water bath if possible. A heavy-bottomed pan will distribute heat more evenly than a thin-bottomed pan. This will help minimize the chance of the butter burning, since each part will melt at the same temperature. A water bath is even safer. However, even a thin-bottomed pan allows you to melt butter more evenly than a microwave.
- You can make your own water bath by stacking two pans on top of each other.
-
Heat over low heat. Butter melts at 28–36ºC, which is approximately room temperature on a hot day. Turn the heat to low to prevent the oil from heating too quickly at this stage, which could cause burning or smoking.
Wait until ¾ of the butter has melted. The heat should be kept low enough to melt the butter without burning. Use a spoon or spatula to distribute the butter in the pan as it melts.
Remove from heat and stir. Turn off the heat or switch to another burner on the stove and stir more melted butter. The butter and pan around the unmelted pieces are still hot and should be hot enough to melt the rest of the butter. This method involves less risk of burning than leaving the butter on the stove to completely melt.
If a recipe calls for glazing, heat the oil until flecked. . You don't need to do this unless the recipe calls for it. In the latter case, keep the oil on low heat and constantly stir it with gentle movements. When you see these flecks, remove from heat and stir the oil until it turns amber brown, then pour into a container at room temperature.
Melting butter in the microwave
-
Cut the butter into pieces. The microwave will heat the butter from the outside in, so cut the butter into several pieces to increase the surface area that can be heated. This will prevent uneven heating, although you should not expect perfectly even heating from the microwave.
Cover the dish with oil with a paper towel. Place the butter in a microwave-safe dish, then cover with a paper towel. The oil may splatter due to the sudden heat generated by the microwave. A paper towel will protect the surface of the microwave from these splashes.
Heat the oil for 10 seconds on low power or using the defrost function. In the microwave, butter melts much faster than on the stove, but also in this case the risk of burning, separation and other problems increases significantly. Start with caution by setting the microwave to low power or function defrosting(if available), then start the timer for 10 seconds.
Stir and check progress. In all likelihood, the butter has not melted yet, but because butter melts at a relatively low temperature, each 10-second interval can make a significant difference to the consistency of the butter. Stir to distribute the heat evenly and check for any tight lumps.
- Note: Be sure to remove cutlery from the bowl before returning it to the microwave.
-
Repeat the process until almost all the butter has melted. Remove the paper towel and microwave for another ten seconds, or five seconds if the butter is almost done. Continue checking the progress until only very small pieces remain in the oil. Carefully remove the bowl from the microwave as it may be hot.
Stir to melt remaining pieces. The remaining small pieces can be melted using the residual heat. Stir the butter until all the butter in the bowl is golden and runny.
Softening the oil
Know how to determine the softness of butter. Unless a recipe specifically calls for texture, butter is considered soft when it is at room temperature. It can be easily crushed with a spoon, but it still retains its shape if left undisturbed.
-
Cut the butter into cubes or bars so the heat doesn't have to reach the center of the butter piece. The smaller the surface to be heated, the sooner the butter will melt.
There is an opinion that under no circumstances should you drown honey, because this process leads to the loss of all its vitamins and beneficial qualities. Experienced beekeepers and specialists dealing with this natural product are sure that these are unnecessary concerns. Let's find out how to melt honey correctly. In order for all the beneficial properties of this sweet to remain intact, certain conditions must be observed.
Let's start with the fact that crystallization of natural bee honey is a natural process. Only in honeycombs can it remain in a liquid state for many days and months, because bees seal their honeycombs quite hermetically. Therefore, when it crystallizes, it does not lose its vitamins and beneficial properties. But if you suddenly need this product in liquid form, and you don’t know how to melt honey, then first you will need:
- metal mesh for cleaning dishes;
- glass or enamel mug;
- large and roomy saucepan.
Fill the prepared mug with honey a little more than half. Then fill the pan with clean water, put it on gas and light the fire. When the water in the pan begins to boil and generate a lot of steam, you need to lower the net for cleaning pots to its bottom and place a mug filled with honey. You ask: “Why do you need to lower the net to the bottom?” So that the water moves freely between the bottom of the pan and the mug.
Melt honey
Now we’ll find out how to melt candied honey. You will need the same accessories for this process, only the amount of water should be slightly less than the edge of a glass or enamel mug (about one and a half to two centimeters). Then you need to turn the heat down, and after about one minute we start stirring the contents with a spoon.

We do this twice with an interval of about one minute. It would be better if the mug of honey was removed from the pan to make it easier to stir and at the same time give it stability. After these manipulations, it must be stirred all the time; it is very important that the heating temperature is no more than 50-60 °C.
If the honey is no more than a year old, then you will only need about ten minutes to melt it. After this, it is advisable to cool the liquid product and place it in a glass jar, tightly closing the lid. Place it in a cool place. It is not recommended to melt natural candied honey again. It is necessary to use it as quickly as possible, otherwise it will not be as useful as before.
Melt honey in the microwave
Many gourmets and simply lovers of natural bee labor exclusively in liquid form, but who do not want to waste their precious time preparing water baths, often ask how to melt honey in the microwave. In fact, this is a pretty simple solution.

A microwave oven, or popularly a microwave, can very quickly, with the help of powerful waves, heat up any food or liquid in a matter of minutes. You just need to press the necessary buttons and the process will start. But you must remember that honey loses all its properties at heating temperatures above sixty degrees. Therefore, if your microwave oven has the ability to reduce the power to medium, then you better do it, otherwise you will end up with a completely useless product that will only be called “sweet amber”.
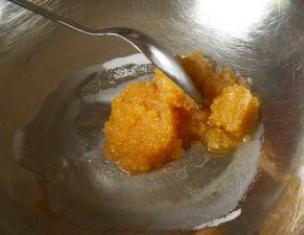
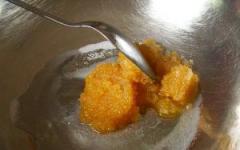
And yet, how to melt honey? After reducing the power, take a container (preferably specially designed for use in microwave ovens), place honey in it, place it on a special glass plate located inside your oven, and lightly press the “+30” buttons to set the desired time. It only takes 30 seconds for it to become completely liquid. But if the natural product is heavily sugared, then one minute is enough.
Another variant
How to melt honey? There is another good method. But this is suitable for those cases when you do not urgently need “sweet amber”. Still, place a jar or other container filled with honey near the stove. After all, you cook a variety of dishes every day, several times. Therefore, the heat emanating from the gas stove will melt the contents of the jar within a few hours, days, weeks. It's up to you to decide when and for what purposes you will need it.
Conclusion
And now you have learned how to melt honey using various methods. Most importantly, do not forget about the heating temperature and power of the microwave oven. You don’t want to consume it without nutrients, do you?

Melted honey cannot be stored for a long time, so use it as quickly as possible, for example, bake a cake or make an alcohol tincture. There are a lot of recipes using this natural product. But it is best to consume it in the form in which it is intended to be, that is, solid. In this state, it can sit in your jars for a very long time and still retain all its useful qualities.
From time to time we are faced with a situation when we only have raw firewood at our disposal, but it is necessary to light a stove or light a fire. What should be done in such a situation, how to light raw wood in a stove, how to make a normal fire from such raw materials, let's figure it out together.
Real live fire in the oven
Step-by-step instruction
Sooner or later, each of us faces the problem of wet firewood, and the situations can be very different. For example, when you need to light a fire in nature to keep warm, cook fish soup, shish kebab, baked potatoes, or when you need to heat the house, prepare a bathhouse to steam and wash. It is much more difficult to light wet firewood, but with the right approach this task can be easily accomplished. Let's consider at the same time how to heat a stove with raw wood and how to light a fire with it in nature.
To implement a simple plan for lighting firewood, we will need:
- a good ax, a sharp knife;
- wet firewood;
- fine salt;
- a stack of ordinary newspapers;
- lighter or matches.
First of all, we need to chop some of the firewood into small pieces, chips. Small pieces of wood will quickly dry out and catch fire, while large logs, on the contrary, will negatively affect our fire. A good ax and a sharp knife will allow you to do the work quickly.

Winter version of a small fire
Note that the firewood inside may well be dry, so we make chips and splinters from the middle part of the logs. If we are dealing with birch firewood, then we remove the birch bark from the blanks. On logs, birch bark will not immediately dry out and catch fire, but separately, on the contrary, it will easily ignite and give the necessary fire.
We assemble a small hut from the resulting wood chips, put small splinters in the base, and cover them with larger wood chips. It is important that there is room for air inside, as well as that air masses circulate freely inside and outside our structure.
We build the hut on a pedestal of newspapers, additionally covering the chips on all sides with newspapers. When placing newspapers inside, you should crumple them and give them some volume. If there is birch bark, also lay it deep in the hut. Sprinkle fine salt on top of the structure. Being a good adsorbent, salt will draw out some of the moisture from the wood chips.

Carrying out preparatory activities before lighting the fire
Note that in a brick-lined stove it is very easy to assemble such a structure and light it. At least it’s more convenient and better to light such a stove than to work with a shapeless gray hole. For many stove owners, the memories of the difficulties they overcame during the construction stage, when they erected the stove, covered it with bricks, and lined it, are still fresh. All the efforts of that time were not in vain; now you can quickly and easily light a fire in the firebox, even from damp wood.
The preparatory measures have been completed, it’s time to set fire to our original structure. At the same time, try to pay attention to whether the wet wood-burning hut made of wood chips will catch fire from the newspapers. If you fail to light the fire the first time, you should repeat the procedure. In this case, the dried wood chips will flare up better. If the fire catches on, it’s time to put in a couple of larger logs. This should be done so as not to block the access of air to the fire.
If we are dealing with a stove, then after receiving fire, we should open the hood and close the doors to the room itself. When lighting a fire in nature, you can blow it a little, using any suitable object as a fan. For the first half hour, you should maintain the fire using only thin chips and logs.
When the fire becomes more confident, you can add more wood. Try not to push too much, clutter the flame, or block the air (oxygen) access to the fire. Large logs can only be laid when you already have a sufficient amount of good coals. If you had to heat the stove with raw wood, then monitor the intensity of the fire, do not let it weaken too much, because if there is not enough heat for new raw logs, then everything may simply go out. Starting a fire requires patience, especially when you are dealing with raw fuel.

Decorative elements accompanying the stove
In order not to think about whether it is possible to heat the stove with raw wood, do the preparatory work, bring some firewood home and dry it near the stove for the future. Dry firewood stacked near the stove and ready for use will allow you not to think about such problems in the future. In addition, a stack of firewood can make a very original decorative item for the home.
Subtleties and nuances
- The worst thing is if you have damp aspen firewood. This type of wood produces a small amount of heat, so aspen firewood will be very difficult to light. The logs will slowly smolder when exposed to temperature, releasing very little heat.
- A good option for quickly kindling raw logs is birch or spruce. Despite the fact that these tree species emit a lot of soot and soot when burned, they are optimal for quick kindling. The fire catches on the chips and birch bark in literally a matter of seconds.

Wet firewood prepared for splitting
- An original way to quickly dry wood was invented by our ancestors. Salt should be poured in large quantities onto wet firewood. The salt will draw out some of the moisture, and the firewood will become usable.
- If we light a fire in nature and we have flammable liquids in our arsenal, for example, diesel fuel, gasoline, kerosene, then it is quite possible to pour these compounds on the wood chips. If we want to use flammable liquids in the stove, we can moisten a rag with them and place it between the logs. The characteristic odor from such liquids will disappear fairly quickly after lighting a fire.
- Some experts recommend putting an empty bottle of vegetable oil in the firebox. With its help you can quickly get the required amount of fire.
Please note that firewood is always purchased raw. It is best to do this in winter, stocking up for the next season, when equipment easily enters the forest. In this case, you will have the firewood for a whole year before using it. They must be stored in a woodpile, protected from precipitation and blown by the wind.
As you can see, there are no particular difficulties with kindling raw firewood; the main thing is to approach this issue thoughtfully and carry out the preparatory work efficiently. With a little patience, you will have a good, intense fire at your disposal, giving
A natural beekeeping product tends to become sugary after a couple of months. In liquid form, it is more pleasant to consume and more convenient to add to baked goods and various drinks. With strong heating, beneficial qualities disappear and are replaced by harmful substances. Therefore, many people have a question about how to melt honey without losing its beneficial properties, and is it possible to do this? We'll talk about this in the article.
There are a lot of useful things in a natural product. There are vitamins, minerals, proteins, amino acids, enzymes. But the peculiarity is quick sugaring which makes it hard. It is impossible to heat honey too much, let alone boil it, so it is necessary to adopt several methods of heating it. Before answering the question of how to make honey liquid, you need to remember the rules for heating it in order to preserve as many nutrients as possible. So:

Before melting the candied honey, you need to be patient, as this procedure takes a long time. After all, you want preserve all its qualities!
How to melt honey in a glass jar?
Many people store the amber delicacy in three-liter glass jars. Therefore, when it takes on a solid form, it is almost impossible to get it out. You can make the task easier in one of the following ways. This is done using:
- Water bath.
- Sun rays.
- A regular heating radiator.
- Warm water.
Let's look at each method.
How to melt honey in a water bath?
 For this heating method you need to prepare:
- Large and small saucepan.
- Glass jar with candied honey.
- Metal grate.
- Thermometer.
- A spoon.
To properly melt honey in a water bath without loss of healing properties You need to pour water into a large saucepan and place a small one in it steadily. It is important that the smaller container does not touch the walls and liquid level in the larger one. Next, pour some water and place a wire rack on which you place a jar of thick treat. Place the outer pan on the fire and monitor the temperature of the water in it; it should not rise above 50 degrees. For measurements, use a regular street thermometer.
When the temperature rises to this point, turn off the heat and wait about 20 minutes. Mix the honey carefully, this will speed up the melting process. If the temperature reaches 40 degrees and the treat does not turn into a liquid state, the stove must be turned on again. It is important to monitor temperature changes and avoid excessive heat.
Drowning in the sun
When a healthy treat is exposed to sunlight, it can heat up to 50 degrees. The melting process begins, thanks to which it is possible to obtain a liquid product without loss of valuable properties. But this method, unfortunately, has two disadvantages:
- You have to wait a long time.
- The weather is not always sunny.
Turning honey into liquid near the battery
 In winter, when the heating devices are turned on, the candied bee product can be melted near the battery. To do this, a three-liter jar must be placed next to the battery. It’s better to do this in the morning, so you won’t have to get up at night to turn it the other way for even melting. If the battery is very hot, then place the jar of treats at a distance from it.
Heat with warm water
The candied bee product can be softened in warm water. Turn on the tap water, measure its temperature, if it does not exceed 50 degrees, you can put it in the sink by closing the drain. After this, place a jar with a healing composition in it. The water will cool down, so you will need to periodically add a new portion, hotter. And the honey in the jar needs to be stirred to speed up the process.
If the water temperature is constant, you can turn on the tap and let the stream flow directly onto the lid of the jar; a constant flow will help turn the candied bee product into liquid.
How to melt honey in the microwave?
There is still some debate as to whether honey can be melted in the microwave without losing its valuable qualities. Some are convinced that when heated in this household appliance, it loses all its beneficial properties. Others believe that if you don't heat it too much, it can preserve them. To do this, you just need to follow certain rules, which read:

Important! It cannot be said that a bee product melted in a microwave retains all the beneficial substances. Microwaves do have a destructive effect on some vitamins, making them “volatile.” Therefore, the kitchen unit can only be used in emergency cases when there is no time to use another method.
Liquid honey thanks to lemon
Honey with citrus fruit is a healthy combination used to treat many diseases. Therefore, lemon is often added to honey drinks. If you want to make a remedy to enhance immunity in order to prevent colds, as well as to prevent heart and gastrointestinal diseases, then melt caked honey with lemon. They do it like this:

Lemon turns honey into liquid, thanks to the acids it contains. The resulting healing mixture is consumed as a snack or added to non-hot drinks or dishes. Dry honey using this method in small quantities to avoid spoilage.
What to do with solid bee products in honeycombs?
 Honey is rarely candied in combs. But if this suddenly happens, do not rush to find ways to melt it. Better cut the honeycomb into pieces and use them instead of store-bought candies and other sweets. Chewed honeycombs will not cause harm, even if swallowed, since they consist of natural ingredients that people use to treat various ailments.
So, you have learned how to make candied honey liquid. Knowing all the secrets of heating candied honey, you will consume only a tasty and pleasant liquid product in winter and spring. It is worth knowing that if liquid honey is sold on the market at this time of year, then it is probably not candied for a long time as a result of immaturity or simple counterfeit. The liquid form is obtained by heating or adding harmful additives. Therefore, ask the seller why it is liquid when it should already crystallize.
Attention, TODAY only!
From the author: Hello, dear friends! The stove is an integral attribute of many private homes. And it’s not surprising, because it is an excellent source of heat. In addition, from time immemorial, a flame in the hearth has always been a symbol of home comfort. In general, the stove brings with it maximum comfort.
Of course, this requires handling it correctly. An improperly melted hearth may not give the expected effect. In addition, do not forget about the fire hazard that always comes with an open fire. Therefore, today let’s figure out whether it is possible to heat with coal, wood and other types of fuel, and how to do it correctly.
Fuel types
Many inexperienced owners mistakenly believe that the stove can be used as a kind of waste disposal unit. They begin to throw various garbage, old clothes, etc. there, based on the idea that the fire doesn’t care what it eats. The result is, at a minimum, an unpleasant odor. In addition, this approach provokes a deterioration in the performance of the furnace itself, since a large amount of soot, carbon deposits and other substances begins to be deposited on the walls of the firebox.
Therefore, it is necessary to use only those types of fuel that are specifically intended for this purpose. A brick stove belongs to solid fuel equipment, therefore firewood, coal, peat, pellets and fuel briquettes are used as resources for its combustion. Let's look at each variety in more detail.
Firewood
Only dry logs are considered as firewood for lighting the stove. You shouldn't lay wet wood, it doesn't burn well. In addition, during the process it releases a lot of steam, since it initially contains a large amount of moisture. Because of this, the furnace channels cool down. As a result, the steam condenses on the walls of the chimney and gradually begins to destroy its walls. To prevent this from happening, the firewood must first undergo a natural drying procedure for at least one year.
Logs have many advantages. First of all, this is an absolutely environmentally friendly material that does not cause any harm to the environment and human health. Its efficiency is quite high, thanks to which the house is quickly heated - firewood burns out well, especially those varieties that belong to hard wood. In addition, in many regions it is the most accessible material that can be obtained without too much cost and effort.
The disadvantages of this type of fuel include the large amount of smoke emitted during combustion, as well as the need to arrange a place for storing supplies - firewood takes up a lot of space, so either a separate room or a large part of the local area is usually allocated for it.
When choosing logs for kindling, it is important to pay attention to two criteria. The first is the density of the wood, depending on the type of wood. The higher this indicator, the longer the fuel will burn, releasing, accordingly, a large amount of heat.
The second criterion is the size of the logs. The thickness of each block should be from 8 to 10 cm, this is necessary for uniform burning, which, in turn, allows the stove walls to warm up efficiently.
Firewood is the most popular type of fuel for. They are not only environmentally friendly and affordable, but also give a pleasant smell and a feeling of comfort. It’s so nice in winter to sit down in front of the fireplace, in which the logs are peacefully crackling - you can look at such a fire endlessly.
Coal

Coal is a much less romantic fuel than wood, but this does not detract from its merits. The main one is that it is highly effective. However, this parameter depends on the type of coal. Stone has the highest efficiency, while brown is the least efficient.
In general, coal is less popular than logs, and is very rarely used to light a stove in a private home.
Peat
Peat is also one of the most popular types of fuel, but it is significantly inferior to firewood in all respects. Regardless of what type of material is used - lump or briquette - after combustion it leaves a lot of ash.
In addition, the stove firebox must be designed specifically for peat and laid out accordingly. The thrust must also be greater than for other types of fuel. Based on all this, we can confidently conclude that peat is best used only when there are no other options.
Pellets
Pellets are fuel in the form of granules made from waste from the wood processing industry. They include wood flour, sawdust, wood chips and tree bark. The granules are produced by dry hot pressing. The result is an environmentally friendly product with a very low level of humidity - it is a maximum of 10%, which looks very advantageous in comparison with conventional firewood.
Pellets are highly efficient. They burn completely, leaving behind only carbon dioxide and water. At the same time, during the combustion process they do not emit any substances harmful to the human body.
Fuel briquettes
Fuel briquettes are a relatively new type of fuel, which is also called eurowood. In essence, they are similar to pellets - high-pressure pressing is also used as a manufacturing method, and the material is sawdust. It is worth considering that no chemical additives - glue or other fastening substances - are used in production. Therefore, the environmental safety of fuel briquettes is beyond doubt.
Their appearance resembles neat logs (that’s why, in fact, they are called Euro-firewood). Briquettes give off heat very well, and do so evenly and for a long time - the burning process of one batch lasts about four hours, which makes it possible not so often to replenish the resources in the firebox, compared to the same ordinary firewood.
In addition, fuel briquettes leave behind very little ash - only 1%. In general, this is an excellent option in all respects.
Rules for using the oven
In addition to selecting fuel, it is necessary to take into account other rules for using the stove in order to get the most out of it. For example, if you have been away for a long time, then you need to perform several steps before starting the kindling.
- Carefully inspect all brickwork. Over time, cracks or crevices may appear in it, through which, when fuel burns, carbon monoxide will leak into the room, posing a danger to human life. If you find such defects, they must be eliminated. For this, clay mixed with sand is taken. You need to carefully cover all the cracks with this mixture and wait until it dries.
- If there is ash left in the stove from previous kindlings, it must be removed.
- The outside must be wiped clean of dust, since when the structure heats up, it can cause an unpleasant odor. If the chimney needs whitewashing, whitewash it.

In addition, there are safety rules related to the regular use of both conventional and sauna stoves:
- Only specially prepared fuel can be used for kindling. It is strictly forbidden to throw household and construction waste into the firebox. This has already been mentioned above, but it is worth repeating. Plastic and various chemical spray cans are especially prohibited - when heated, these things either release substances hazardous to health or even explode, thereby creating a fire hazard;
- it is strictly forbidden to open the door to the firebox and the vent at the same time;
- fuel and other flammable materials must be located at a distance of at least half a meter from the stove;
- To avoid overheating of the stove, it can be lit only twice or thrice a day, and each run should take no more than two hours. This applies when wood is used as fuel;
- If the stove is used continuously, it is necessary to clean the chimney 2 or 3 times a month. This is necessary for high-quality removal of combustion products;
- Under no circumstances should you use various flammable substances for kindling: for example, acetone or gasoline. It may blaze so that the whole house turns into one big stove;
- If the family has small children or pets, the stove must be under constant supervision while the fuel is burning.
As you can see, the main part of the rules is aimed at protecting the house and the people living in it from possible dangers associated with the use of fire. If everything is carefully followed, the stove will bring you extremely positive emotions, making your home warm, cozy and comfortable. Good luck!