A candy cake is a real chocolate bomb that will amaze you with its taste and design. Such a treat does not require special storage conditions, like cakes with cream and fruit, and to prepare it, you just need to know how to use scissors and glue.
To please a loved one with a sweet surprise in the form of a cake, you don’t have to be a pastry chef or love the baking process. Using your own imagination, a couple of handfuls of your favorite candies and scrap materials, spending a little free time, you can create a real masterpiece - a candy cake.
Of course, various materials can be used to create certain structural elements, so below is an approximate list of what may be required during the work process:
- thick cardboard;
- Styrofoam;
- scissors;
- sandpaper;
- glue gun;
- double-sided and regular tape;
- PVA glue;
- toothpicks or bamboo sticks;
- colored corrugated paper;
- various candies.
- First you need to make the base of the cake in the form of a round cylinder, the diameter and height of which will be equal to the diameter of the future cake. Such a frame can be glued together from thick cardboard or cut out of polystyrene foam. For smoother edges, sand the foam cylinder with sandpaper. If you plan to make a product of several tiers, then you need to make several cylinders;
You can purchase false cakes as a foam base for the cake at a confectionery store, then the task will be much easier.
- Next, the base needs to be covered with colored corrugated paper. The joints around the circumference of the cylinder can be beautifully decorated with beautiful braid, beads or decorative cord. After this, sweets are glued to the side of the cylinder in a circle using double-sided tape;
- An important stage in making cake decorations. Sweet flowers made from candies can become such a decor. They are all made according to the same principle: they tape candy to a skewer or toothpick, cut out petals from corrugated paper and also tape it to the toothpick. From several of these flowers you can assemble a composition to decorate the top of the cake;
- When all the elements of the sweet design are ready, all that remains is to connect the tiers together, attach the top decoration and give a sweet surprise of hand-made beauty.
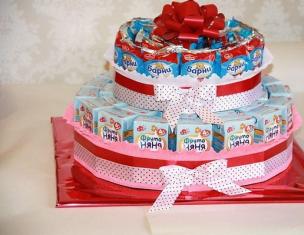
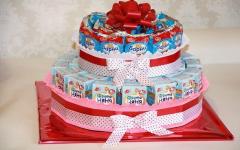
Children will remember this cake made from juice and sweets for a long time. It will be the center of attention at a children's party, so they will not soon want to take it apart into separate sweets and eat it. This cake can be round, like the previous options, or you can make it square.

List of required materials and tools:
- penoplex 1-2 cm thick;
- cardboard square box;
- corrugated paper;
- scissors and glue;
- juices in small rectangular packages;
- candies;
- Double-sided tape;
- satin ribbons and additional decorative elements.
Master class in steps:
- Cut out a square base from penoplex foam on which to place and secure the juices. Decorate the cut of the backing with a satin ribbon; you can also tie it around the juices;
- Cover a cardboard box with paper and sweets and secure it to the juices. It is not necessary to do this so that the corners coincide; you can shift it so that the corners of the upper tier “look” at the sides of the lower one;
- Decorate the cake using artificial flowers, butterflies, toys, ribbon bows - those elements that will look harmonious in color and style.
On the occasion of the Eighth of March, you can please your mother, grandmother, sister or friend with a delicious figure-of-eight cake made from sweets.

To make such a gift you must prepare:
- penoplex or polystyrene foam;
- corrugated paper in “floral” colors;
- skewers or toothpicks;
- green translucent packaging film;
- glue;
- narrow tape;
- candy sticks and round candies in colorful wrapper.
A way to make a cake from sweets on March 8:
- Cut a figure eight out of polystyrene foam (penoplex) using a utility knife. As a template, you can outline two round plates of different diameters slightly overlapping. Use fine sandpaper along the edges, smoothing out the cuts;
- First cover the sides of the foam figure eight with corrugated paper, making a slight overlap on the top of the number. Then glue the candy sticks, first bending and gluing the tails with tape so that they are not visible;
- Slightly break off one pointed edge of each toothpick. Tape a round candy to it with tape, securing it by the tails. Cut the corrugated paper into strips 2.5 cm wide and 6-10 cm long (depending on the size of the candies). Twist each strip in the center and fold in half, stretching the middle a little. Attach three of these petals to each candy, and the spring crocus is ready;
- Pierce the foam with the sharp end of a toothpick and fill the surface of the figure eight with candy flowers. Cut the green film paper into squares, fold them diagonally several times and screw the middle to a cut toothpick so that the corners are at the top. Use these green leaves to fill the gaps between the crocuses;
- The cake is almost ready, you can only add additional accents to it - an artificial butterfly, ladybug, beads, etc.
Cake made from sweets and chocolates
A cake of this type can be made according to the basic recipe for a candy cake, using chocolates and candies for decoration, but there is another way - to assemble the cake from individual segments.

In this case use:
- colored thick cardboard;
- ruler;
- stationery knife and scissors;
- glue and double-sided tape;
- corrugated paper;
- sweets and chocolates.
Algorithm of actions:
- Using a template, cut out and assemble hollow, opening segments of the cake from colored thick cardboard;
- Place candies inside each segment, decorate the side surfaces with chocolates, and decorate the top of each segment with a flower made of paper and/or candies;
- Put the segments together to make a cake, and you can invite those with a sweet tooth to a delicious feast.
Sweet design with tea
Most people with a sweet tooth love to wash down their sweets with hot, aromatic tea. In this case, why not please your beloved sweet tooth with a sweet box cake made of tea and sweets.

To make such a gift, in addition to desire and free time, you will need:
- penoplex;
- thick cardboard;
- corrugated paper;
- glue;
- scissors;
- sharp knife;
- sandpaper;
- Double-sided tape;
- sweets and tea (Greenfield) individually packaged in beautiful bags.
Progress:
- From a piece of polystyrene foam of a suitable height, cut and sand a ring, one and a half to two centimeters wide - this will be the base of the box. Cut out the bottom and lid of the box from cardboard - two circles of the corresponding diameter;
- Cover the surface of all structural elements with corrugated paper of the selected color. Corrugated paper can be glued to cardboard with double-sided tape, and to penoplex - only with a glue gun;
- Glue the bottom to the base. Attach tea bags to the outside of the side of the box with double-sided tape, slightly overlapping each other. Decorate the lid of the box with candies and paper and attach it to the base. You can put sweets and the same tea bags inside the candy and tea gift.
For a man
There are no fewer men with a sweet tooth than children and women combined, so each of them will be delighted by a candy cake, especially if you add it with “masculine” elements, for example, alcohol in small bottles (Jack Daniels, Finlandia, Jim Beam).

To make such a sweet gift you will need:
- a round box (preferably tin) for cookies;
- a piece of penoplex from which you can cut a circle with a larger diameter than the box;
- glue gun;
- corrugated paper;
- satin ribbon;
- candy sticks.
How to make a DIY candy cake for a man:
- Cut a round cylinder from penoplex foam, equal in height to a cookie box, but a few centimeters larger in diameter;
- Glue the pneplex cylinder and the outer side of the box with paper, then stick candies on the sides, wrap both tiers of the cake on top of them with a satin ribbon, which is tied in a beautiful bow;
- Glue the foam tier and the box together. Place fruit, sweets and/or alcohol on top of the box. Perhaps add some decorative elements and the cake is ready.
Candy cake for kindergarten

For such a treat, kindergarten will need:
- cardboard;
- scissors;
- glue;
- paper;
- candies.
Manufacturing technology:
- Glue together the bases of two or three tiers of cakes of different diameters from cardboard and decorate them with colored paper. You can use either regular colored paper or corrugated paper. Cover the joints with decorative elements such as braid or lace;
- Glue candies to the sides of the structural elements. Rectangular-shaped confectionery products in a beautiful wrapper are suitable. You can take one type for all tiers or a separate one for each. Decorate the rows of sweets on top with a narrow lace or satin ribbon;
- Connect all tiers together using glue. You can crown the composition with a soft toy, flowers or a number equal to the number of years the birthday person has turned.
If, instead of sweets in one of the tiers, you attach, for example, small bottles with soap bubbles to the side, then each of the guests will also receive a small gift as a keepsake.
Unusual “masterpiece” in the shape of a heart

On Valentine's Day or any other memorable occasion, you can please your loved one with an unusual gift in the shape of a heart, the creation of which will require:
- thick cardboard;
- scissors;
- glue;
- white and red corrugated paper;
- Raffaello candies and Kinder bars;
- additional elements for decoration (beads, ribbons, flowers, etc.).
Sequence of actions:
- Cut out two identical hearts from thick cardboard. Along the perimeter of one of them, retreating 1.5-2 cm deep, glue a rectangular strip, the width of which is equal to the height of the Kinder bars;
- Cover the resulting box and a separate heart on all sides with corrugated paper (red on the outside and white on the inside);
- Using double-sided tape, glue the bars to the side of the box, and tape the heart-shaped lid in several places from the inside so that it can be opened;
Pour Raffaello candies into the middle of the box, and decorate the top of the box cake to your liking. In this case, the cake decoration can be made from a small soft toy, candy flowers, a box with jewelry, for example, a ring, if the man decided to propose marriage in this way.
A candy cake is a sweet and original gift that will fit perfectly into the cheerful atmosphere of March 8, New Year, or children's party. If you want to surprise your relatives, friends, or co-workers with an elegant and exotic present, make a cake from their favorite candies.
How to make a cake out of chocolates
We will be making a three-tiered birthday cake, so buy plenty of delicious candies in beautiful wrappers. In addition to sweets, you will need: penoplex (insulation material) 30 mm thick, scissors, corrugated paper, glue, tape.
- Cut out three circles from the insulation with diameters of 12, 17, 25 cm. Cover two of them (the second and third) with corrugated paper, and from the first, stepping back 1 cm from the edge, cut out the inner part - the future removable cover.
- Make the second part of the lid Ø12 cm from cardboard and decorate it with corrugated paper. Connect the foam blank with hot glue to the prepared cardboard.


- Attach the candies to a strip of paper using double-sided tape.


- Glue white corrugation inside the small form, extending it with a fringe 1.5 cm above the edge.


- Repeat the procedure with the other tiers, then glue them down to form the cake. Open the lid of your building and fill the hole with candy to create a surprise cake. Decorate a delicious gift with ribbons, artificial flowers and lollipops.


How to make a cake out of sweets - an easy way
The easiest option is to make a cake frame out of cardboard. You will also need: glue, tape, scissors, colored paper and various small things for decoration.
- Prepare two strips of cardboard, each 10 cm wide. Take the length you need, taking into account that one strip should be shorter.
- Glue the bases together. Attach the resulting cylinders with the hole to the cardboard, draw circles - the lids will come out. Make teeth on them, stepping back 1 cm from the outer edge, which will help glue the structure together and cut out the blanks.
- Apply glue to the teeth and glue the caps to the top of each cylinder. Decorate the tiers with colored paper or bright fabric and connect them together, securing with glue.
Attach the candies to the cake using adhesive tape, pull them to the side with narrow lace, tying it with a bow. Place the finished cake on a flat dish and serve.

How to make a cake from sweets - varieties
Not only polystyrene foam and cardboard are suitable for a cake frame, but also boxes of cookies, sweets, and tea. Decorate them at your discretion, fill them with sweets, and you will get a special souvenir.
- Office party coming up? It's time to make a delicious dessert from sweets with liqueur or cognac.


- If you want to please your child on his birthday, a sweet design made from juice and sweets will be the best gift option.


- A heart cake filled with balloons of Raffaello sweets will help you congratulate your friend on her upcoming marriage in a non-trivial way.

How to make a cake from sweets - baking
For a home celebration, make the candy treat more edible by replacing the cardboard frame with biscuit dough layers.
- Prepare the dough from 4 eggs, a glass of sugar, 150 gr. flour. Place the whipped mixture into a greased pan and bake for 35 minutes at 180º.
- Cut the dough into cakes and soak them in berry syrup.
- Assemble the cake by coating all layers, sides and top with whipped butter and condensed milk cream (1:3) and 1 tbsp. l. cocoa.
- Divide the top of the product into segments, separating them with wafer rolls. Attach the same waffles to the sides with soft cream, and tighten them so that they stick with a beautiful ribbon. Pour small candies, such as sea pebbles, into the sectors and put the dessert in the refrigerator for three hours.


Making a cake from sweets is not difficult - you just need to choose the right sweets and show your imagination, and grateful relatives will definitely appreciate your efforts. After all, you can’t buy such a sweet surprise in any store!
You can make a variety of crafts from sweets, cakes with your children and bring them to kindergarten. It’s very good for the kids to then separate such a cake into separate candies, if there are candies in there and not candy wrappers.
It turns out very festive and elegant.
The box should be made of cardboard and the walls should be lined with candies, and then covered and decorated beautifully.
You can use candies like Kit-Kat, Kinder, Snikers and others.


It’s not difficult to assemble a cake from Kit-Kat chocolates, you can put sponge cakes inside, chocolate candies like Skitls, mamp;ms are poured on top, you can make decorations from mastic like toys, animals, birds and cartoon characters (Angri Birds, Minions):


Here is a cake you can make from sweets and chocolates for the New Year:

Here is a step-by-step technique to perform visually:

Now it has become very fashionable for a child’s birthday to bring to kindergarten not just sweets and cookies in a bag and then distribute them to your classmates, but to make a magnificent masterpiece of sweets and please the whole group.
There are many options. You can try to decorate the cake yourself or order it from a professional.
There is nothing complicated here. The most important thing is your imagination and building material: Barney, waffles, candy bars, lollipops, dragees, juices, chocolates, kinder surprises, marmalade, ribbons, corrugated paper, etc.


You can make a cake from sweets and chocolates yourself. It's not difficult at all. To make your masterpiece, prepare - candies, preferably large ones, corrugated paper, ribbons, bows, artificial flowers, as well as a cardboard frame - it can be made from cardboard, or use a cardboard box from a store-bought cake. By the way, for such a cake you can use children’s favorite Kinders, and even soft toys for decoration, and the shape of the cake does not have to be standard (round or square) - you can make a cake in the shape of a ship (for a boy)
Master class on making a gift with your own hands. Today we are making a gift cake for a girl for her 4th birthday. We'll put some goodies there that she loves.
If you find it difficult to choose a gift, then making such a cake will be a great solution for you. After all, it can be given not only to a child, but also to a woman, for example, on March 8th or on a birthday, or to a man on his holiday. True, the filling of the cake will be different, according to the taste of the recipient.
Be sure to look at the other article for gift ideas. If you want to congratulate your child’s teacher or educator, you will find suggestions in.
To make such a gift, no special skills are required. The main thing is that if you are making it for your grandmother, grandfather, father, mother, teacher, educator or for other people, you can involve your children in the craft. This is a powerful educational moment when a child participates in a common cause with his parents. And, of course, production should be accompanied by a good mood and a desire to do something pleasant.
Cake Supplies:
- corrugated cardboard from unnecessary boxes;
- wrapping;
- tape measure or ruler;
- scissors;
- glue;
- tape – double-sided and regular;
- ribbons of different widths and colors;
- products for filling the cake.
First, cut out circles of the required size from corrugated cardboard. You can draw a circle using a compass or utensils suitable in diameter.
Now we cut out 3 strips according to the diameters of the circles. We make the width of the strip so that it is about 1 cm higher than the products used.
We corrugate the strips along the entire length so that they can be easily and neatly connected into a circle.


These are the 3 corrugated strips we should get.

We apply the corrugated part to the circle, if everything matches, for convenience we glue the two sides with tape. If there is excess left, just cut it off.


We do the same with the rest of the blanks.

If everything turned out nice and neat, you can glue it inside and out. We used a glue gun. It glues quickly and is almost odorless. If your glue has a strong odor, leave the workpieces in a dry, ventilated area for a while. Let the smell dissipate.

As a result, you should have a design like this.


When the entire structure is ready and adjusted, we cut out the base in the form of a circle of even larger diameter.

Now we need to cover the entire structure with beautiful paper. You can use gift wrapping paper or any other. We use corrugated paper. She is soft and pliable. But you have to work with it carefully - it can tear.

Trace the outline of the circle for the pallet with a pencil. Step back from the line 6 - 7 centimeters for the hem allowance. And cut out the circle.

In order for the paper to lay flat on the cardboard, the fold must be cut with scissors. For convenience, we used double-sided tape to prevent the paper from moving.


Now you can glue it.


Now we need to paste over the tops of our cylinders. We cut the paper along the circles with allowances for hems. Fold the resulting circle several times and cut out teeth like these.

Glue it.

We cut out strips of paper for the barrels, not forgetting about the allowances for the hem at the bottom.

We cut the paper at the bottom to make gluing easier.

Glue the largest cylinder onto the base.

We do the same with the other two, gluing them on top of each other.

Let's move on to the most enjoyable stage of decorating our cake - filling it with food. But first place the entire structure on a rigid foundation. For example, like ours, on a sheet of plastic.

Sweets are always a welcome gift for any holiday; children eagerly await them; they are given to ladies and loved ones. Sweet gifts are gaining great popularity and can well serve as an independent gift. On the Internet you can find photos of crafts made from sweets for every taste.
Candy stand
Crafts from candies are easy to make with your own hands for any holiday. The most popular are bouquets of sweets. Any candy is suitable for creating bouquets, but it is easier to work with round and light-weight ones.

Bouquet of roses
Necessary materials:
- Candies 15-20 pieces
- Long skewers
- Corrugated paper in two colors for buds and green for petals
- Glue gun
- Scotch
- Threads
- Organza
- Satin ribbons

We cut blanks from corrugated paper for petals measuring 8*12 cm, fold the blanks in half and round the ends, forming petals. We secure the candies on the skewers with tape. We tightly twist the candy into the petal and secure it with thread at the base. We stretch the edge of the corrugation, forming petals.


From green paper we cut out small pieces 0.7 cm wide, about 10 cm high, round the ends with scissors. For each flower you will need 4-5 leaves, glue them to the base of the flower so that the leaves are slightly higher than the petals. For realism, slightly curl the ends of the leaves. We wrap the skewers up to the middle with green paper and secure them with glue.

We collect the resulting flowers into a bouquet in a spiral and tie them with ribbon. We turn the bouquet over and decorate it with corrugated paper, and tie the packages with thread. We decorate the bouquet with organza on top and tie it with satin ribbons.

Additionally, the bouquet can be decorated with beads and bows made of satin ribbons. Candy flowers can be placed in a basket.

Candy heart
- To make it you will need:
- Styrofoam
- Skewers or toothpicks
- Candy flowers
- Jewelry (beads, ribbons)

We take foam plastic 3 cm high to make the base, draw a heart on it and cut it out. We make flowers from candies according to the previous master class. Instead of long skewers, you can use toothpicks.

Glue corrugated paper to the resulting heart on both sides, use an awl to make holes and insert candy flowers. We decorate the edges of the heart with corrugated paper and organza, or tie it with a wide satin ribbon.

Sweet card
Necessary materials:
- Thick cardboard
- Sweets and chocolates
- Colored paper

We select the size of the postcard ourselves, fold the cardboard in the shape of a book. For the base, instead of cardboard, you can use the cover of an old book. We write wishes on two sheets of paper of the required size and glue sweets; you can use white or colored paper.

We wrap the card-book with colored or wrapping paper, secure everything with glue, and paste sheets of wishes and sweets inside the card. We decorate the outside with beads and appliqués.

A postcard can be given not only for birthdays, but also to coincide with a themed holiday. Candies can be wrapped in colored paper, then they will resemble gift boxes.


Handmade gifts always delight the heart and eye; they speak of a special reverent attitude.

Candy crafts for children
For children, sweet gifts are made in the shape of animals or cars; such gifts are more complex. But with the help of step-by-step instructions, you can make a candy cake for children.

Two-tier candy cake
To prepare, you will need two round cardboard boxes of different diameters; you can make them yourself from cardboard, or use ready-made ones. The larger box will be the first tier of the cake, fill it with sweets and close it, place a smaller box on top and glue it. We also fill the insides with any sweets.

To decorate the ends you will need long candies of square or rectangular shape; we fix them in a circle with glue. The top of the cake can be decorated with small candies in multi-colored candy wrappers and small toys.

After the holidays there is always a lot of candy wrappers left over; they can be used for children's creativity or adult crafts. You can make simple Christmas tree decorations, colored appliques and much more from multi-colored candy wrappers.

Paper candy wrappers are suitable for creating origami figures, and snowflakes can be cut out from foil candy wrappers. Making crafts from candy wrappers will not only diversify children's creativity, but will also help save on materials.

Photos of candy crafts