Salty dough - it is accessible to all, cheap and easy to learn material.
Salt dough well develops fine motor skills, imagination, dexterity, broadens the knowledge of the surrounding world, the idea of shape and color.
Instruments:
Little rope;
Jar of water;
Brush for wetting the dough, dyeing the dough;
Garlic extractor;
Molds for cutting dough;
Baking tray;
Small knife;
Strainer;
Stack or plastic knife;
Cardboard (base) for the panel;
Wooden toothpicks;
Rollers for rolling dough;
Almost all the tools can be found in your own kitchen, and if you need to buy something extra, the costs will not be too big.
You also need a cup of flour and a board for rolling out the dough, a small container of water, and a towel.
Materials for making salted dough, depending on the recipe:
PVA glue;
Vegetable oil;
Potato starch;
Salty Dough Recipes
Salted dough for making small figures
4 tbsp. spoons of flour
2 tbsp. spoons of salt "Extra"
1 tbsp. spoon of water
2 drops of PVA glue
Dissolve 2 tablespoons of salt "Extra" in a tablespoon of water, add 1-2 drops of PVA glue. Then, gradually adding flour (about 4 tablespoons), stir the contents with a wooden stick in a bowl until the dough is wrapped around the stick. Remove the dough from the sticks and knead until it is smooth and elastic. With this kneading, the dough will not tear and crumble during the molding.
Simple dough
125 ml of water
Gentle dough
100 g potato starch
150 ml of water
Elastic dough
150 grams of salt (fine)
100 ml of water
1 tbsp. spoons of vegetable oil.
Soft dough for air drying
art. spoons of pva glue
125 ml of water
Well suited for sculpting figures with fine details, Circuits better hold.
Hard dough for rough figures
125 ml of water
Cover the dough, as it dries very quickly in the open air.
Sculpturing technique
When working with salt dough the same techniques are used as when working with clay, clay. In order to connect the parts together, you need to hold the brush dipped in water at the connection points and, having stuck the parts, press them together for a while. If you need to glue small parts, then do it best with the help of half a toothpick.
It is possible to apply a drawing on a product from salty dough with the help of various available tools. They must always be on hand. These can be items such as a comb, toothpick, ball pen cap, old ball pen stem, garlic press, cookie baking tins, cooking syringe nozzles, beautiful relief buttons, beads, chains, thread, pebbles, tailor wheel for translation patterns, etc.
Large products must be done by resorting to the help of the frame. The frame can be made of wire, foil, as well as from various boxes, jars, cups.
Salt dough storage
The quality of salt dough is improved during storage. It is better to use it the day after cooking.
The finished salt dough can be stored for a long time in a plastic bag in the refrigerator. If it becomes softer, you can add a little flour to it.
You can freeze the salted dough (for longer storage), while the properties are preserved. The recipe must be chosen without the use of vegetable oil and PVA. They can be added after defrosting.
Drying products from salt dough.
- In the oven
Cover the baking sheet with foil (so the product will not stick to the baking tray), put the product on the baking sheet. You need to dry in the oven at the lowest temperature with the door ajar, otherwise the products may burn, bulge or change color. First you need to put the baking sheet on the top shelf and stand there until those until the product starts to brown. After that, rearrange the baking sheet on the middle shelf - the product will not warp. Drying time, depending on the thickness of the product - 30-60 minutes.
2. Outdoors.
Products are dried for several days in a cool place without drafts.
3. On the battery.
On the battery or in the sun, the products will dry in about a week. But for this it is necessary that the products are not very large, otherwise the time of their drying will be much longer.
4. Combined drying.
Most suitable for bulk moldings: products are kept for several days in the sun, and then dried in an oven at a low temperature.
Coloring of finished products.
After drying, the products of salt dough can be painted and varnished. Acrylic paints can be used for coloring, but it is best to use artistic gouache with some PVA glue added to it. After drying, this mixture is slightly shiny and does not stain hands.
For varnishing you can take acrylic varnish. It is water soluble, non-toxic and dries 6-8 hours.
Salted dough is an excellent alternative to clay. A plasticine product will never last as long as from a dough. There are a variety of modeling techniques, designed for different children's age.
Sculpting itself is very useful, it develops fine motor skills of children's fingers, stimulates the development of speech. Older children develop thinking and imagination through the modeling of dough. You can embody any flight of fantasy. Not for nothing that no one grew up without classes with clay.
You can make individual figures, panels, paintings, magnets from salt dough. Subjects of work and the degree of complexity can be very different.
Making the dough at home with your own hands every mother is not difficult. After all, every hostess at least once in her life cooked dumplings or pancakes. It's all the same here.
For the preparation of salt dough, we need:
- One glass of water;
- One glass of salt, preferably small;
- Two glasses of flour;
- Vegetable oil;
- PVA glue;
- Food colors in different colors (optional).
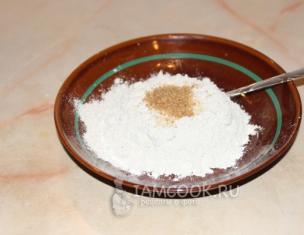
Let's start the work by preparing all the ingredients. Put everything on the table so that all the ingredients are at your fingertips.
Important point in cooking good test for quality molding, first add salt to water. If possible, buy extra fine salt.

Salt is well dissolved in water, do not be lazy to prevent a couple of minutes. Water is better to take warm.

Add most of the flour, mix well. This is easy to do manually, but you can also use a mixer, decide for yourself how easy it is for you: interfere with your hands longer, or wash the bowl of the mixer afterwards.

Add dough glue to dough. He will help products to be stronger.

Then add a few tablespoons of vegetable oil. The dough will be more elastic and less stick to hands.

Finally mix everything well.

We pour flour on a table or a special board for dough, divide the dough into approximately. The number of parts depends on how many colors we have paint, only one more lump should remain uncolored.

Put some dough on flour, sprinkle with food dye. You can drop water on the dye itself, it will dissolve faster.

We will knead the dough, gradually it will color evenly, absorb the flour and become thicker.

Similarly, paint over and knead the rest of the dough.

Four colors are enough, but never again will not be superfluous. Leave one piece white. There are modeling techniques, where they use white dough and paint ready-made figures. But still, beginners and small children will be more interesting to work with colored material.

The final form of crafts.
Salty dough gives you the opportunity to play out childish fantasy. You can make cute fish from white dough, paint and varnish them.

Fish from salted dough.
Create such a magic flower together with your daughter.

Flower from salt dough.
Or such a cheerful snowman with a bright scarf. All products can be simply dried or baked in the oven. They will please you for a long time.

Snowman from salt dough.